07 Jan 2020
In Ruby Language, if we want to use a FIFO(First In First Out) Queue data structure, we can use Array as a Queue. If you want to use a queue object in a multi-threads program, then you can choose to use ruby Queue class.
Let’s learn to use them with some examples:
Use Array as a Queue
Ruby Array provides us plenty of useful methods.
If we see the last index as the head of the Queue, we can use #unshift to enqueue, #pop to dequeue, and to peek the head element, with this approach we can use #last method.
queue = Array.new # or []
queue.unshift "dog"
queue.unshift "cat"
queue.unshift "cow"

# queue is: ["cow", "cat", "dog"]

queue.last  # peek returns "dog"

queue.pop # "dog"
queue.pop # "cat"

# queue is: ["cow"]
We could see the index 0 as the head of the queue. Then we will use #push as enqueue method, #shift as dequeue method, and #first as the peek method.
queue = Array.new # or []
queue.push "dog" # or <<
queue.push "cat"
queue.push "cow"

# queue is: ["dog", "cat", "cow"]

queue.first  # peek returns "dog"

queue.shift # "dog"
queue.shift # "cat"

# queue is: ["cow"]
There are another two methods #size and #empty? used a lot for a queue.
For example when we want to loop through the queue
while !queue.empty? do # or queue.size > 0
  item = queue.pop
  # do thing with item
end
Ruby Queue Class
Ruby Queue class is a thread-safe, blocking queue implementation. And we can use it in a multi-threaded program.
We can use #push, #enq and #<< methods to enqueue.
And use #pop, #deq and #shift methods to dequeue.
Those methods are more intuitive than methods in Array
The blocking feature is decided by non_block argument in #pop method, the default value for non_block is false, so when the queue is empty, the calling thread is suspended until data is pushed onto the queue.
If non_block is true, like queue.pop(true), the thread isn’t suspended, and ThreadError is raised.
I will create another post to demonstrate how to use Queue in a coding interview problem.
Ruby SizedQueue Class
SizedQueue is another Queue implementation in which you can specify the size capacity for the queue. If the capacity is full then the push operation will be blocked.
sized_queue = SizedQueue.new(3)  # the maximum size is 5

sized_queue.push("a")
sized_queue.push("b")
sized_queue.push("c")

sized_queue.push("d")  # This one is blocked.
#push method can accept another argument non_block, the default value is false, if non_block is true, the thread isn’t suspended, and ThreadError is raised.
Last Thing
There is one disadvantage of using Queue and SizedQueue classes, they both don’t have the #peek method to let you peek the head element of the queue.
I will show you how to implement a thread-safe Queue using Array in another Ruby Rate Limiter post.
18 Apr 2019
 快速应用Starter Template的效果
Materialize CSS是一个比较新的基于Google Material Design的前端框架,界面非常简洁,而且很容易使用。
其中,在最新发布的1.0版本中,去掉了对于JQuery的依赖,这是一个很大进步。因为在Rails5以后也是移除了JQuery,而且接下来在我的项目中,我会开始使用React.js作为前端的开发框架。
下面就来介绍一下通过Webpacker安装和使用Materialize的步骤:
准备工作:
在app/javascript/下面创建stylesheets目录以及application.scss文件:
$ mkdir app/javascript/stylesheets
$ touch app/javascript/stylesheets/application.scss
然后我们需要import刚才创建的scss文件,让Webpacker帮我们编译scss文件
// app/javascript/packs/application.js

import '../stylesheets/application'
在页面中引入Webpacker帮我们编译的application.js和application.css文件
# app/views/layouts/application.html.erb

<%= stylesheet_pack_tag 'application', media: 'all', 'data-turbolinks-track': 'reload' %>
<%= javascript_pack_tag 'application', 'data-turbolinks-track': 'reload' %>
使用yarn安装materialize-css,
我们可以在node_modules/materialize-css下面找到安装好的文件
下面我们要把materialize.js加入到application.js中
// app/javascript/packs/application.js

import 'materialize-css/dist/js/materialize'
然后到application.scss中引入materialize.css
// app/javascript/stylesheets/application.scss

@import ‘materialize-css/dist/css/materialize’;
最后我们还需要在application.html.erb中加入Materialize依赖的字体和图标
// app/views/layouts/application.html.erb

<link href="https://fonts.googleapis.com/icon?family=Material+Icons" rel="stylesheet">
安装配置到这里就完成了,接下来就是找一些Materialize的实例,应用到网站上吧。
更多的细节可以参考我完成的commit: Github commit
09 Feb 2019

大会总结
两天的2019年澳洲的 Ruby 技术大会顺利结束了,这次大会组织的还是很不错的,现场的秩序和投影和音效都不错,不足的地方就是由于场地选在比较老的Forum Melbourne,里面的座椅不是特别舒服。
本次大会的内容还是很丰富的,很多演讲者都是来自英国,美国。除了 Ruby 相关的技术主题,还有不少人文关怀的内容,比如 ADD(注意障碍),情绪管理和全球变暖的话题。
下面我来推荐几个我觉得非常不错的分享:
The Case Of The Missing Method - A Ruby Mystery Story
Nadia Odunayo 通过一个非常好的故事解释了 Ruby 中的 singleton class 的秘密,以及讲解了 singleton class 在 DSL 的实际应用,Nadia 的演讲节奏控制的非常好,声音非常清楚。
点击观看
How to hijack, proxy and smuggle sockets with Rack/Ruby
Dávid Halász 通过一个非常具体和实际的例子,演示了 Ruby 中的 Socket 编程相关的技术。
点击观看
Taming Monoliths Without Microservices
Kelly Sutton 在演讲中再次强调了如果要对 Monolithic Rails 应用进行拆分的话,重要的还是要把 Domain 划分清楚,以及如何恰当得处理 Domain 的界限和依赖,着重强调了不要有相互的依赖,依赖最好就是单向的。
点击观看
Representations Count
Tom Stuart, 来自英国,Understanding Computation书的作者。他有着一口典型的英式口音。一听到这样的口音就让我想到了 IT Crowd. Tom 演示了通过不同的抽象表达,会对写代码解决问题产生巨大的影响。他用直观的图形解释了如何优雅的实现一个带负号的四则运算的实现。
点击观看
A Branch in Time (a story about revision histories)
Tekin Süleyman 也是通过一个生动的故事讲解了写好 git commit 信息的重要性,视频中还会学到几个新的 git 命令可以帮助你快速查找历史,以及展示了一些写好 git commit 的最佳实践。
点击观看
Views, from the top
Tim Riley 系统的介绍了 dry-rb view的主要功能和使用方法。演示了如何通过 dry-rb 来写一个更加 OO 的 view 层的代码。
点击观看
Learn to make the point: data visualisation strategy
Mila Dymnikova 解释了数据可视化的重要作用,即使对于开发人员,在进行工作总结和汇报的时候也是非常重要的。她给出很具体的实现方法和一些好用的工具和服务。她的 PPT 做的非常生动。
点击观看
Building APIs you want to hug with GraphQL
Tom Ridge 介绍了如何设计和实现一个好的 GraphQL APIs.
点击观看
What the hell is a JRuby?
Tom Gamon 非常简洁清楚得总结了几种不同的 Ruby 的实现,重点介绍了 JRuby 的实现以及在什么情况下我们可能会考虑在产品环境使用 JRuby。视频里面提到的两本书《Working with ruby threads》《Ruby Under a Microscope》确实都是非常不错的。
点击观看
It’s Down! Simulating Incidents in Production
Kelsey Pedersen通过一个具体的实例,讲解了如何通过 Feature Flag 模拟产品环境的故障,然后如何分析故障以及完善相关的工具和流程。非常具有实战意义。
点击观看
Mechanically Confident
Adam Cuppy 演员出身的他有丰富的舞台经验,声音非常洪亮,非常能够调动现场的气氛,他总结了如何通过一些实践来建立好的 routine,从而不断取得进步然后建立自信。
点击观看
What were they thinking?”
Keith Pitty 凭借非常多年的经验,总结了软件开发方面的一些思考。
点击观看
更多视频请到Ruby Australia 的 Youtube 官网查看
07 Jan 2019

When you are using MySQL, if a migration fails the DDL will not be rolled back with the transaction, potentially leaving the database in an invalid state, which could theoretically bring the whole application down.
Referencing model classes in a migration
Generally you would not need to reference model classes in a migration unless you were modifying existing data in some way, or adding new data. Sometimes we need to do this, but referencing application model classes raises some problems.
- If a model class is referenced in one migration, then the model’s table is altered in a subsequent migration, the annotation written to the model’s file will not reflect the subsequent alteration.
- Old migrations referencing the model might fail if the model code has evolved significantly since the time the migration was written.
To avoid these problems, you should:
- Avoid using Active Record models in your migrations by using SQL
- If you must use Active Record models, create a migration-specific class for the purpose.
Let’s look at an example where we want to strip leading and trailing whitespace from a column. A naive implementation might look something like this:
class MyMigration < ActiveRecord::Migration
  def change
    User.where.not(name: nil).each do |user|
      user.update name: user.name.strip
    end
  end
end
Using SQL
Of course, doing this in SQL is quite simple and far more efficient than using Active Record to load and modify each record individually:
class MyMigration < ActiveRecord::Migration
  def change
    execute <<-SQL.squish
      UPDATE users
         SET name = LTRIM(RTRIM(name))
       WHERE name IS NOT NULL
    SQL
  end
end
Note: that squish-ing your SQL is recommended because it makes the migration output a lot easier to read.
Using a migration-specific model class
Some data migrations can’t be easilly expressed in SQL, so let’s say we want to stick with using Active Record. In such cases, we can create a migration specific class for the purpose:
class MyMigration < ActiveRecord::Migration
  class User < ActiveRecord::Base
  end

  def change
    User.where.not(name: nil).each do |user|
      user.update name: user.name.strip
    end
  end
end
Here the migration will use the MyMigration::User class instead of ::User
15 Jan 2018

最近我已经完全从 Sublime 转到了 VS Code,VS Code 的各种功能做的还是非常不错的. 在这里也向大家推荐。
其中我最喜欢的就是集成了 terminal,然后在做 Rails 相关的项目开发时,通过 Rspec 的插件可以快速的在集成的终端中运行测试和调试代码(pry debug)。
这样在开发的过程中就不需要离开编辑器去调试代码,极大的缩短了BDD和 TDD 的循环时间。
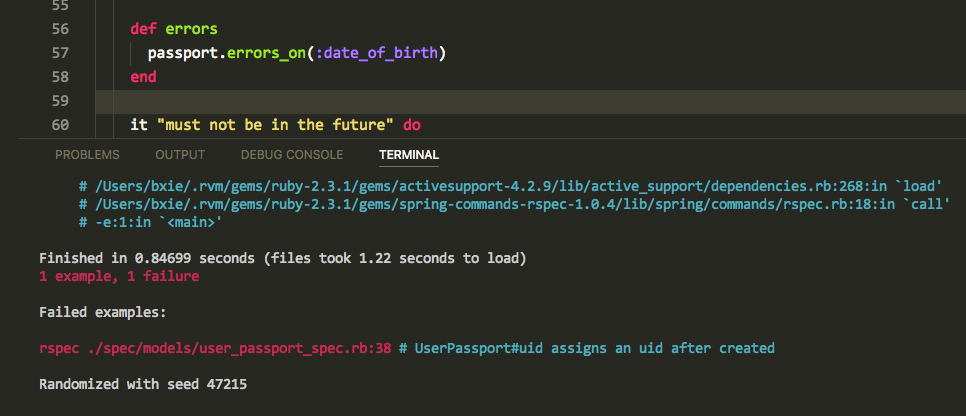
由于我还是喜欢把 terminal 放到下面,然后也不能给 terminal 很大的空间,当测试失败的时候,会打印出很长的 backtrace,这时候经常就需要滚动鼠标才能查看失败的信息或者异常信息. 效果如下图所示:

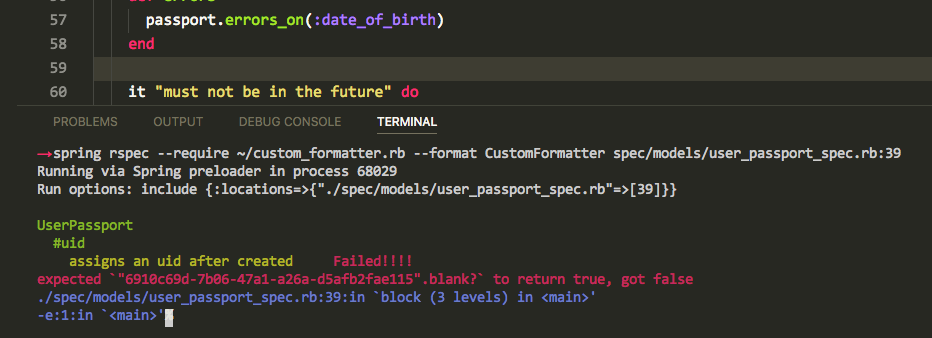
这时想到了,Rspec 支持自定义的formatter,这样我就可以把输出的 backtrace 简化,保留我可能感兴趣的出错文件和测试信息.看上去的效果如下。

详细的custom_formatter.rb代码请见: gist link
使用方法:
把 custom_formatter.rb 下载到本地,然后配置 Rspec 插件,设置如下:
"ruby.specCommand": "spring rspec --require ~/custom_formatter.rb --format CustomFormatter"
Tips
- 在 VS Code 的 terminal 中可以,按住 Command 键然后点击带有行号的出错文件信息,以快速的打开文件
- VS Code的 Markdown 插件也很棒,让我也不再需要单独的 markdown 编辑器
 快速应用Starter Template的效果


