BigBing 技术博客

Add new font for ImageMagick on Mac OS X and Ubuntu

Use Case

I am developing a Rails application which can add some beautiful text on the image. So I used the powerful tool ImageMagick(wrapped by gem MiniMagick).

As I said I need to make the text looks beautiful, so I have to install some fonts on both my Mac OS X and Ubuntu Server which can be used for ImageMagick. For example, this beautiful Lato fonts.

on Ubuntu Server

Actually, on Ubuntu, there is already a package to intall. It’s very straightforward.

1. Install fonts-lato

sudo apt-get update
sudo apt-get install fonts-lato

2. Find the font name to use

Find the available font list with:

mogrify -list font | grep Lato

#output
Font: Lato-Medium
  family: Lato
  glyphs: /usr/share/fonts/truetype/lato/Lato-Medium.ttf
Font: Lato-Medium-Italic
  family: Lato
  glyphs: /usr/share/fonts/truetype/lato/Lato-MediumItalic.ttf
Font: Lato-Regular
  family: Lato
  glyphs: /usr/share/fonts/truetype/lato/Lato-Regular.ttf

Then, just grab a font name like ‘Lato-Regular’ to use in the code.

on Mac OS X

1. Install Lato fonts

Download the Lato fonts from here. Unzip the download file. And copy any .ttf font files which you want to use to /Library/Fonts

2. Generate type.xml for ImageMagick

Make a new directory for ImageMagick local settings and cd into it

mkdir ~/.magick
cd ~/.magick

Grab the script to find all fonts and store them in a config file

curl http://www.imagemagick.org/Usage/scripts/imagick_type_gen > type_gen

find /Library/Fonts -name *.ttf -o -name *.otf | perl type_gen -f - > type.xml

Go to ImageMagick config folder

cd /usr/local/Cellar/imagemagick/6.9.3-7/etc/ImageMagick-6

Edit system config file called type.xml and add line near end to tell ImageMagick to look at local file we made in earlier step

<typemap>
  <include file="type-ghostscript.xml" />
  <include file="~/.magick/type.xml" />  ### THIS LINE ADDED ###
</typemap>

3. Find the font name to use

Find the available font list with:

mogrify -list font | grep Lato

### output
Font: LatoM
 family: Lato Medium
 glyphs: /Library/Fonts/Lato-Medium.ttf
Font: Lato
 family: Lato
 glyphs: /Library/Fonts/Lato-Regular.ttf

Because the script generated the name is not as same as it is on Ubuntu Server. So we can manually edit the ~/.magick/type.xml file and change the name, then in the code we use the same font name.

理解Rails5中Controller和Integration测试

这篇文章首先介绍Rails5中controller测试的变化,然后通过类图来分析Rails5中的IntegrationTest相关的类组织结构。通过理解相关的类和模块的关系来帮助我们写出更好的测试。

在之前的文章minitest + capybara测试基于devise的用户注册中,也是通过创建继承自ActionDispatch::IntegrationTestFeatureTest类,然后引入Capybara的DSL模块,来方便我们创建其他Feature Test或者叫User Acceptance Test。

第一部分:Rails5中controller测试的变化

1. ActionController::TestCase废弃掉了

在Rails5中Controller测试都是继承自ActionDispatch::IntegrationTest类,而不是之前的ActionController::TestCase。如果还想继续使用,那么可以使用这个gem: rails-controller-testing

2. assigns和assert_template也废弃掉了

在Rails4的controller测试中assigns方法用于获得action中的实例变量然后进行验证,assert_template用于验证action最后渲染了指定的template。

在Rails5中,controller测试强调的更多的是action的处理结果,比如响应的状态和响应的结果。

如果你还是想使用上面这两个方法,还是可以在rails-controller-testing这个gem中找到他们。

3. 移走assert_select等方法

assert_select等验证响应的HTML内容的方法,已经移到单独的rails-dom-testing这个gem中。

所以,如果是我要验证页面的内容和样式等,还是通过capybara来进行精确的操作和验证。

4. 使用URL而不是Action来发送请求

在Rails4中,通过action的名字来发送请求(说实话我一直很不习惯)

class PicturesControllerTest < ActionController::TestCase
  def test_index_response
    get :index
    assert_response :success
  end
end

而在Rails5中,要换成URL(多直观),否则就会抛出异常:URI::InvalidURIError: bad URI

class PicturesControllerTest < ActionDispatch::IntegrationTest
  def test_index
    get pictures_url
    assert_response :success
  end
end

5. HTTP的请求方法中必须使用关键字参数

在Rails5中,HTTP请求的方法参数必须明确指定关键字,比如params,flash等。这样会让代码更加清楚。请看例子:

class PicturesControllerTest < ActionDispatch::IntegrationTest
  def test_create
    post picture_url, params: { picture: { name: "sea" } }
    assert_response :success
  end
end

第二部分:理解ActionDispatch::IntegrationTest类和相关module

在继承了ActionDispatch::IntegrationTest类的Controller测试中,我们可以使用很多方便的helper方法和大量用于结果验证的assertions方法。 比如跟响应相关的:

json = response.parsed_body # 解析json格式的响应结果
assert_response :success # 验证成功的请求

还有跟路由routing相关的

assert_routing({ method: 'post', path: '/pictures' }, controller: 'pictures', action: 'create')
assert_recognizes({ controller: 'pictures', action: 'index' }, '/')

如果你要测试文件上传功能,Rails提供了非常方便的方法fixture_file_upload。但是你会发现你无法在controller中直接使用,你需要引入ActionDispatch::TestProcess模块。有点奇怪?

所以,为了搞清楚这些helper方法和assertions的来源,也方便我们日后查询相关的文档,我会通过下面的类图来理解IntegrationTest这个类。

1. ActiveSupport::TestCase

首先在Rails中我们有ActiveSupport::TestCase类,它继承自Minitest::Test类,然后像ActionDispatch::IntegrationTest, ActionView::TestCase, ActiveJob::TestCase等我们自己的测试需要继承的测试基类,都继承自ActiveSupport::TestCase类。同时你会发现,我们自己的model的测试都是直接继承自ActiveSupport::TestCase类。

所以在我们的测试中,可以直接使用minitest提供的一些assertions,比如常见的:

assert_equal( expected, actual, [msg] )
assert_includes( collection, obj, [msg] )
assert_instance_of( class, obj, [msg] )

由于ActiveSupport::TestCase引入了ActiveSupport::Testing::Assertions模块,所以我们可以使用非常方便的方法

assert_difference(expression, difference = 1, message = nil, &block)
# 例如
assert_difference 'Article.count' do
  	  post :create, params: { article: {...} }
end

assert_no_difference(expression, message = nil, &block)

另外还有两个比较有用的被引入的模块是ActiveSupport::Testing::FileFixturesActiveSupport::Testing::TimeHelpers。他们分别提供了访问fixtures下面的文件和修改测试时间的方法

file_fixture(fixture_name)

travel(duration, &block)
travel_back()
travel_to(date_or_time)

2. ActionDispatch::IntegrationTest

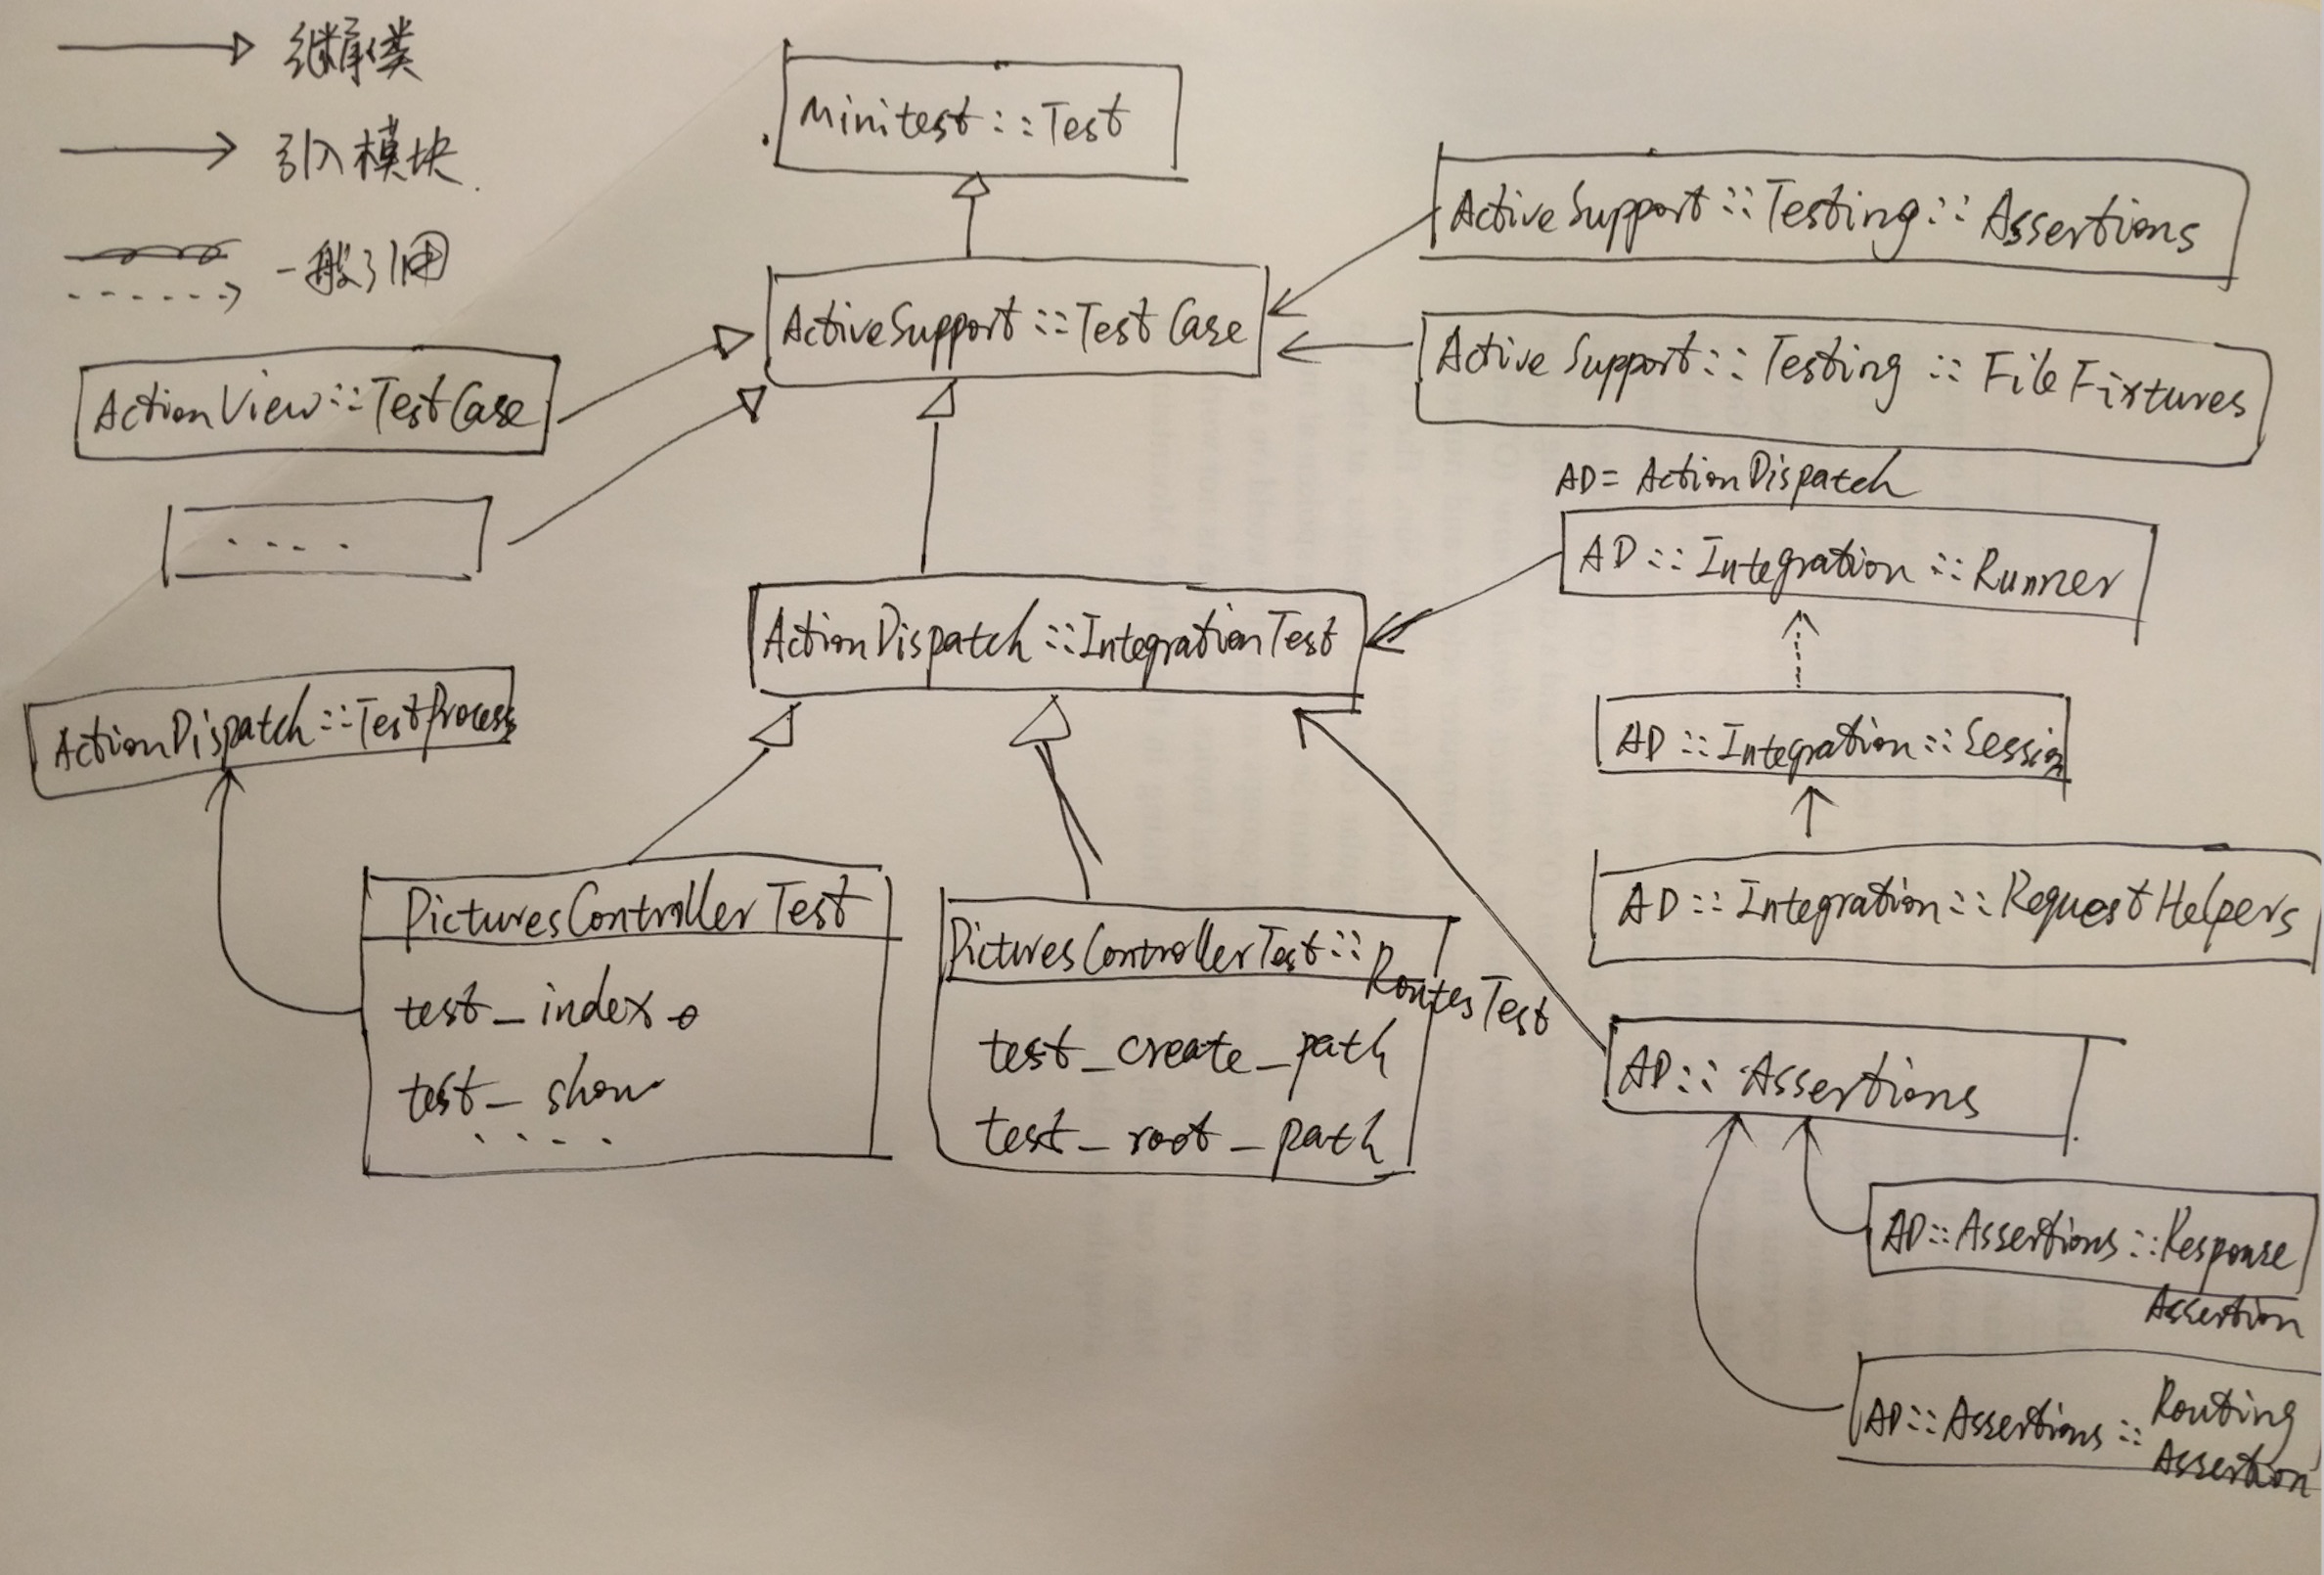
接下来我们再来看看IntegrationTest这个类,它首先通过引入Integration::Runner模块,从而一起引入了ActionDispatch::Assertions模块,然后Runner中运行测试的时候,会创建Integration::Session类的实例,Integration::Session引入了Integration::RequestHelpers模块,所以我们就可以使用像get, post, put等HTTP请求相关的方法。 具体的这些请求相关的方法,参考文档: ActionDispatch::Integration::RequestHelpers

了解了发送请求的方法后,我们再来看看ActionDispatch::Assertions模块,它只是引入了另外两个重要的module:ActionDispatch::Assertions::ResponseAssertionsActionDispatch::Assertions::RoutingAssertions

ResponseAssertions中提供了常用的assert_redirected_toassert_response方法

assert_redirected_to login_url
assert_response :redirect

RoutingAssertions中提供了上面展示过的:assert_generatesassert_recognizesassert_routing方法,用于进行路由Routing相关的测试。

所以,理解了IntegrationTest的结构后,我们就知道为什么我们还需要引入ActionDispatch::TestProcess来测试文件上传,详细的如何测试Carrierwave的文件上传功能我会在下一篇文章中介绍。


补充,本文发到rubychina论坛后,有朋友问如何测试ApplicationController中的Filter,比如常见的Devise:authenticate_user!

class ApplicationController < ActionController::Base
  protect_from_forgery with: :exception

  before_action :authenticate_user!
end

然后创建一个/test/controllers/base_controller_test.rb

require 'test_helper'

class BaseController < ApplicationController
  def index
    head :ok
  end
end

class BaseControllerTest  < ActionDispatch::IntegrationTest
  include Devise::Test::IntegrationHelpers

  setup do
    Rails.application.routes.draw do
      get 'base' => 'base#index'
    end
  end

  teardown do
    Rails.application.reload_routes!
  end

  test 'redirects if user is not logedin' do
    get '/base'

    assert_response :redirect
    assert_redirected_to 'http://www.example.com/'
  end

  test 'returns success if user is loggedin' do
    sign_in users(:one)

    get '/base'
    assert_response :success
  end
end

可以看到使用minitest,代码更加直观,没有太多的magic,直接定义一个临时的controller来测试验证登录的filter.

Rails5为Minitest提供了更好用的Runner

之前有写过一篇在Rails4项目中使用minitest进行测试的文章: minitest + capybara测试基于devise的用户注册

Rails5中新的runner

如果你已经开始使用Rails5,你可能已经发现当你运行bin/rails -h的时候,Rails提示你现在还支持使用bin/rails test来运行所有的测试。

这个新的runner提供很多非常好用的功能,而且有spring预加载的帮助,运行速度很快。

  1. 可以通过指定行号来运行某一个测试,这对于跟sublime等开发工具的集成有很大帮助.(之前只能通过指定测试名称来运行单个测试)

     $ bin/rails test test/models/user_test.rb:27
    
  2. 可以同时运行多个不在同一个文件中的测试

     $ bin/rails test test/models/user_test.rb:27 test/models/post_test.rb:42
    
  3. 快速失败功能,通过-f参数来指定,当有一个测试失败时就马上停止测试。
  4. 延迟显示错误信息,通过-d参数来指定,在运行完所有的测试后一起显示错误信息。
  5. 指定-b显示详细的错误的调用信息
  6. 运行匹配的测试,通过-n参数来制定匹配的字符串或者正则表达式

     $ bin/rails t -n "/create/"
    
  7. 仍然可以通过-s来指定seed
  8. 指定-v参数可以查看详细的测试运行过程,其中包括每个测试的运行时间,这样有助于找出运行慢的测试

Sublime的集成

有了这样强大的runner,在Sublime的RubyTest插件中就可以设置相关的命令来运行当前文件的所有测试或者某个测试,这是我所喜欢的开发测试方式。

"run_ruby_unit_command": "rails test {relative_path}",
"run_single_ruby_unit_command": "rails test {relative_path}:{line_number}",

Looking forward to Turbolinks 5

As a practical rails developer, we all want to keep up to date with new Rails direction and status. With coming Rails5 we will have Turbolinks 5 and Rails API.

Turbolinks 5 focuses on integration with native iOS and Android Wrappers. Rails API is designed for the client-side MVC and 100% native mobile apps.

Turbolinks acturally is very good technology. It gives rails developers the performance benefits of SPA approaches without writing a lot of javascript.

What we need to do is just follow Rails guide and keep all of you JS and CSS in the HTML <head>. Turbolinks will only load the body party via AJAX when user triggers a link.

But sometimes if I want to update part of the page with Rails, I can response a piece of javascript rendered with a html partial, this is also very cool. And PJAX is another good solution,especially when your page has a side menu bar or tabs, PJAX can update the content part of the page.

Some of the famous rails websites are using turbolinks, like Shopify, Github(pjax) and Basecamp. So if you haven’t used it, you can start with the Turbolinks 5.

Rails4新项目-使用ECMAScript6

在Rails项目中使用ES6是非常容易的事情。只需要以下两步步就可以完成:

  • 在Gemfile中添加:gem 'sprockets-es6'
  • 然后就可以在javascript的目录中创建以.es6为扩展名的文件

你可以继续保留coffeescript,通过扩展名来区分就可以了。

经过一段时间使用,发现ES6的以下功能比较好用:

1.使用let来定义变量

如果是之后不会变化的常量,可以使用const

let和const都是有block scope的,减少了使用var易产生bug的问题。

2. => 箭头函数

使用箭头 => 数替换匿名函数,在箭头函数中this就是定义该函数的对象

有一点需要注意:如果使用jQuery,不可以使用$(this)获取触发事件的对象,可以明确的使用$(event.currentTarget)

3. object literal:

在对象中可以用更加直观地方式定义function:

doSomething() {
  this.doSomething2();
},

doSomething2() {

}

4. Default arguments 参数的默认值

var hello = function(name = "guest") {
  alert(name);
}

此时,如果不传参数,name的默认值就是guest

5. Rest参数

var awards = function(first, second, ...others) {
  var gold = first;
  var silver = second;
  var honorableMention = others;
}

6. Destructuring

var [first, , last] = [1, 2, 3]

set name(name) {
  [this.firstName, this.lastName] = name.split(" ");
}

7. Interpolation 字符串的拼接

`Template strings allow strings to span
 multiple lines and allow interpolation like 1 + 1 = ${1 + 1}
`
get name() {
  return `${this.firstName} ${this.lastName}`;
}

推荐资料

  1. 阮一峰 《ECMAScript 6入门》
  2. Overview of ECMAScript 6 features